Complete installation Magento 2.3.x#
Spend your time?
If you don't want to spend your time installing the theme, don't hesitate to order installation service at MAGEBIG INSTALLATION SERVICE
System Requirements
Magento 2.3 technology stack requirements
Recommended to use Cloud Server or Dedicated Server starting at least 2vCPU and 4G RAM:
- Cloudways: The best Managed Cloud Hosting Platform for Magento

- Digital Ocean Cloud Server
- Vultr Cloud Server
Before you start your installation#
Before you begin, make sure that:
- Your system meets the requirements discussed in Magento System Requirements
- You completed all prerequisite tasks discussed in Prerequisites.
- After you log in to the Magento server, switch to a user that has permissions to write to the Magento file system. One way to do this is discussed in switch to the Magento file system owner.
The complete installation method can be used if you want to set up a Magento store using a sample content. We assume that you have completed all the preparation steps.
The installation process consists of 3 stages:
Stage 1#
Creating a database.#
First, you need to prepare a new database for your Magento store. You can create the new database using the database management tool from your hosting control panel (usually PhpMyAdmin).
Sample data import:
Complete Package folder contains the sample data file sampledata.sql
This file is located under the /database folder of the theme. It allows you to load sample data, so that your website looks exactly like our demo theme.
Warning
Should not import sampledata.sql if you already have the data on your site. By importing sampledata.sql all the products will be erased from your store.
Info
If you do not want to install sample data, use clean database while installing Magento. Skip the Sample data import step.
Stage 2#
Get the metapackage#
To get the Magento metapackage:
- Log in to your Magento server as, or switch to, the Magento file system owner.
- Change to the web server docroot directory or a directory that you have configured as a virtual host docroot.
- Create a new Composer project using the Magento Open Source.
Go to your website directory, ensure it's empty
cd /your/magento/directory/
Get Magento Open Source
composer create-project --repository-url=https://repo.magento.com/ magento/project-community-edition=2.3.7-p4 .
Use this key (if you don't have)
Public Key:
ee0a2956a4036957e9472354248c7938
Private Key:
b82892d69dd4ed75dba8a25e9e5225f5
Uploading and extract the file#
Upload complete-package.zip file to the server , where magento should be installed then extract it through Control Panel or ssh command
unzip complete-package.zip
Upload patch magento 2.3.3 - 2.3.7-p4.zip file to the server and run command:
unzip patch\ magento\ 2.3.3\ -\ 2.3.7-p4.zip
Stage 3#
Magento Installation#
Installing a Magento Commerce engine together with the theme you have purchased.
When you are done with uploading and extract the file, you can start Magento engine installation process.
The following example installs Magento with the following options:
-
The Magento software is installed in the `magento2` directory relative to the web server docroot on `localhost` and the path to the Magento Admin is `admin`; therefore:
Your storefront URL is `http://127.0.0.1`
-
The database server is on the same host as the web server.
The database name is `magento`, and the username and password are both `magento`
-
Uses server rewrites
-
The Magento administrator has the following properties:
- First and last name are `Magento User`
- Username is `admin` and the password is `admin123`
- E-mail address is `user@example.com`
- Default language is `en_US` (U.S. English)
- Default currency is U.S. dollars
- Default time zone is U.S. Central (America/Chicago)
- `--use-secure=1` and `--use-secure-admin=1` if your domain has SSL (https://)
bin/magento setup:install \
--base-url=http://127.0.0.1/magento2/ \
--base-url-secure=https://127.0.0.1/magento2/ \
--use-secure=1 \
--use-secure-admin=1 \
--db-host=localhost \
--db-name=magento \
--db-user=magento \
--db-password=magento \
--admin-firstname=Magento \
--admin-lastname=User \
--admin-email=admin@gmail.com \
--admin-user=admin \
--admin-password=admin123 \
--language=en_US \
--currency=USD \
--timezone=America/Chicago \
--use-rewrites=1
Messages similar to the following display to indicate a successful installation:
Post installation file permissions check...
For security, remove write permissions from these directories: '/var/www/html/magento2/app/etc'
[Progress: 274 / 274]
[SUCCESS]: Magento installation complete.
[SUCCESS]: Admin Panel URI: /admin_puu71q
Install additional library:
composer require hybridauth/hybridauth ^3.7
Disable Magento_TwoFactorAuth module on first install (you can re-enable it after setting up Magento email)
bin/magento module:disable Magento_TwoFactorAuth
bin/magento setup:upgrade
Disable module
bin/magento module:disable MageBig_ExtendPageBuilder
bin/magento setup:upgrade
Finally, reindex data and flush cache:
bin/magento indexer:reindex
bin/magento cache:flush
Stage 4#
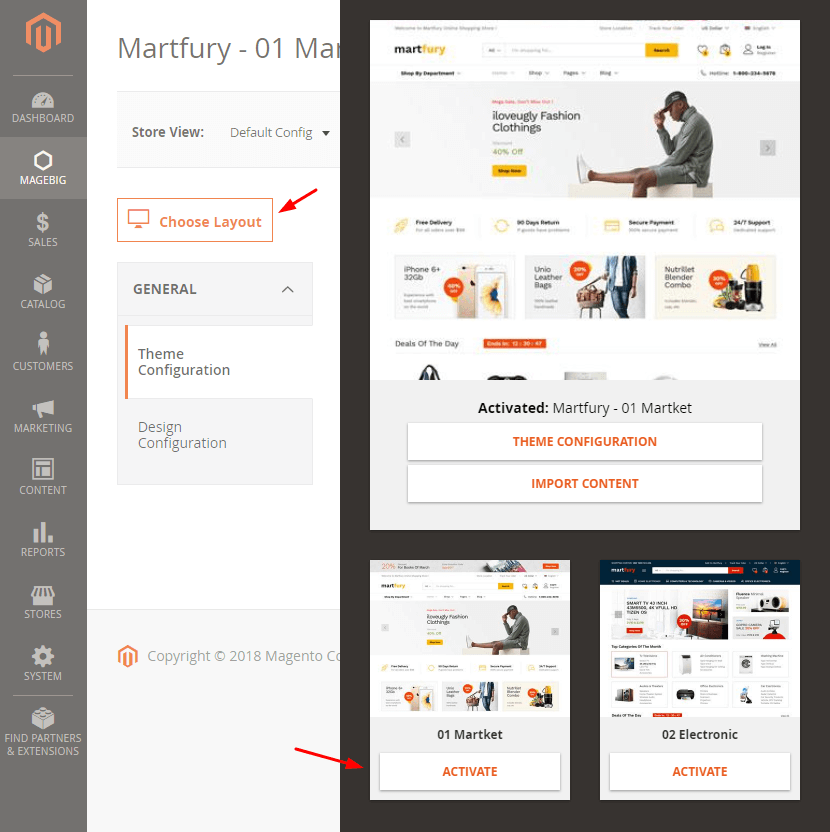
The first layout is automaticaly activated after installation success.
If you want change the layout of theme, please follow the steps:
- Login to your backend
- Go to MAGEBIG > Themes > Martfury Theme
- In theme configuration, click to button Choose Layout and click Active layout which you want to use.
Spend your time?
If you don't want to spend your time installing the theme, don't hesitate to order installation service at MAGEBIG INSTALLATION SERVICE